Connect your IoT project for free using community-build infrastructure – long range
LoRa (wiki) is a new approach how to „build“ internet. Best from my point of view is fact that you can connect for free – if someone is running gateway close to you. See great community project The Things Netwotk.
Here you can find my notes once building your own LoRaWAN endpoind (node) and LoRaWAN Raspberry Pi-based Gateway.
1. Build DIY LoRaWAN node (end point)
HW needed : BSFrance LoRa32u4 II Lora Development Board – price cca 15USD – get it at AliExpress
Note : some boards need to perform soldering at board to enable Lora – refer to great technical forum for this boards at TTN forum
Step 1 : get drivers (Windows only) – https://github.com/adafruit/Adafruit_Windows_Drivers/releases/
Step 2 : download https://github.com/BSFrance/BSFrance-avr and unpdack it into Arduino IDE dir /Documents/Arduino/Hardware
Step 3 : connect board via USB, in Arduino IDE select menu Tools – Board – list LoRa32u4II and select proper port
Step 4 : download https://github.com/matthijskooijman/arduino-lmic as zip, in Ardiono IDE menu Sketch – Include Lib – From Zip – select downloaded zip
Step 5 : configure this lib in /Documents/Arduino/libraries/arduino-lmic-master/src/lmic/config.h – enable debug
#define LMIC_DEBUG_LEVEL 1

#define LMIC_PRINTF_TO Serial
Step 6 : go to TTN web https://www.thethingsnetwork.org/ – register, create new app, create new device, in device settings select activation method ABP for start
Step 7 : in Adruino IDE – open example sketch in /Documents/Arduino/libraries/arduino-lmic-master/examples/ttn-abp/ttn-abp.ino
Step 8 : modify sketch – copy ABP keys from Step 6, you need Network session key NWKSKEY in msb format, application session key APPSKEY in msb and Device Adress DEVADDR (format 0x+number from portal)
Step 9 : modify sketch – pinning for selected board
const lmic_pinmap lmic_pins = {

.nss = 8,

.rxtx = LMIC_UNUSED_PIN,

.rst = 4,

.dio = {/*dio0*/ 7, /*dio1*/ 5, /*dio2*/ LMIC_UNUSED_PIN}

};
Step 10 : upload code from Arduino IDE into LoraBoard *
Step 11 : open serial monitor and check activity. You should see similar lines as board is trying to connect to LoRaWAN and send data
23:15:06.269 -> Starting

23:15:06.269 -> RXMODE_RSSI

23:15:06.269 -> 144965: engineUpdate, opmode=0x808

23:15:06.269 -> 145933: TXMODE, freq=868100000, len=26, SF=7, BW=125, CR=4/5, IH=0

23:15:06.269 -> Packet queued

23:15:07.326 -> 212141: RXMODE_SINGLE, freq=868100000, SF=7, BW=125, CR=4/5, IH=0
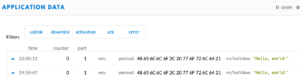
Step 12 : Open console at https://console.thethingsnetwork.org/applications and wait for data comming in. This can take some time, so be patient.
* Note: I had big troubles uploading any code into board. It is pretty unstable because boards seeems to disconnect after 15seconds. My workaround: upload simple sketch (like blink.ino from examples) 1st and than upload your actual code. If you have problems doing so, press reset button on board during upload. Good luck.
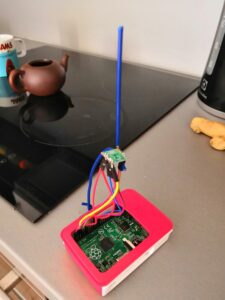
2. Build DIY LoRaWAN gateway
HW needed :
- Raspberry Pi
- HopeRF RFM95W board – price cca 5USD – get it at AliExpress
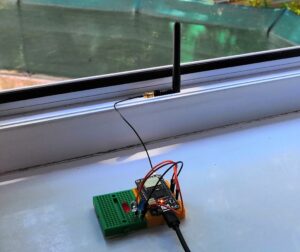
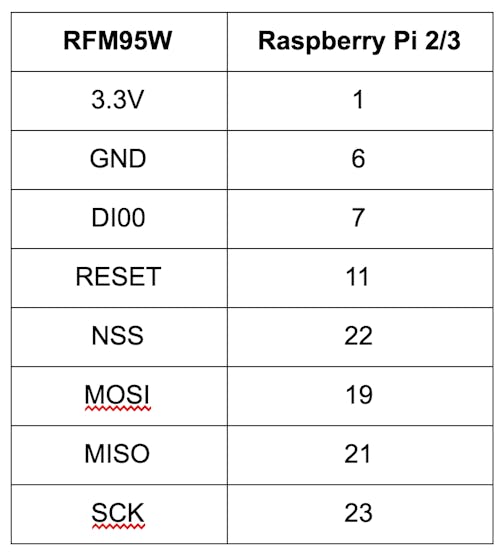
- DIY Antena – use solid wire 86mm longStep 1 : wire RFM95 board and Raspberry – see table here. Mentioned pins at Raspberry are HW pin numbers, not GPIO numbers.
Step 2 : solder antenna vertically to ANT pin
Step 3 : ssh to Raspberry, enable serial in config
sudo sudo raspi-config
select Interface settings, SPI, enableStep 4 : still at ssh at Raspberry – install LoRa Gateway SW – single_chan_pkt_fwd
cd /home/pi

git clone https://github.com/hallard/single_chan_pkt_fwd

cd ~/single_chan_pkt_fwd
Step 5 : change config
sudo nano global_conf.json
change
"pin_nss": 6,

"pin_dio0": 7,

"pin_rst": 0
Step 6 : make and run
make

sudo /home/pi/single_chan_pkt_fwd/single_chan_pkt_fwd
Step 7 : you will get console output similar to this
Trying to detect module with NSS=6 DIO0=7 Reset=0 Led1=unused

SX1276 detected, starting.

Gateway ID: b8:27:eb:ff:ff:c1:d7:bb

Listening at SF7 on 868.100000 Mhz.
stat update: 2019-06-26 20:44:31 GMT no packet received yet
Step 8 : try to send some data from your node – than you will notice incomming data to gataway
Packet RSSI: -72, RSSI: -108, SNR: 9, Length: 23 Message:'.r...~..pu..TO......._.'

rxpk update: {"rxpk":[{"tmst":504372116,"freq":868.1,"chan":0,"rfch":0,"stat":1,"modu":"LORA","datr":"SF7BW125","codr":"4/5","rssi":-72,"lsnr":9.0,"size":23,"data":"AHLeAdB+1bNwdQuhVE/QngCc/wPyXwc="}]}
Step 9 : Register gateway at https://console.thethingsnetwork.org/gateways, select „I am using the legacy packer forwarder“ and as Gateway EUI use number from Step 7 – Gateway ID (looks like Mac address)
Step 10 : Observe network traffic in „Traffic“ tab.